
How to Use Instagram Auto-DMs Safely (Must-Know Tips to Avoid Restrictions & Fix Errors)
When you run marketing campaigns or events on Instagram, auto-DMs (Direct Messages) are a powerful way to expand your touchpoints with customers. But used the wrong way, your account can be flagged as spam — leading to limited features or halted sending.
Today we’ve put together the core rules for running auto-DMs safely without account restrictions, plus how to respond when sending stops.
1. Essential rules for safe auto-DM operation
① Use an officially API-certified service
The most basic way to protect your account is to use a certified service built on Meta’s official API. Unofficial programs or web-scraping methods are a leading cause of account suspension (shadowban).
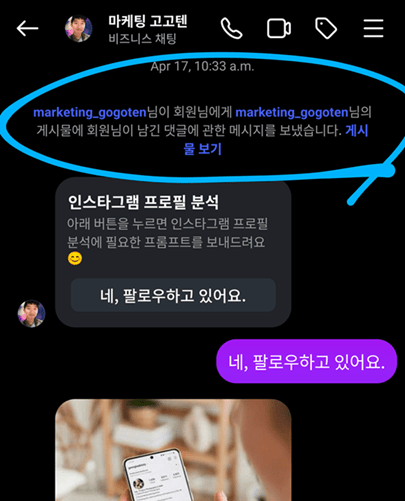
If you see this notice, your auto-DMs are being sent through Instagram’s official API.
② Use comment-based (inbound) triggers
Automated actions that run through Instagram’s official API only fire after the other person takes a voluntary action first. Automation programs that go out and find specific targets to message on their own are not going through Instagram’s API — and you should avoid that kind of program.
③ Vary your message wording (no repeating the exact same text)
Sending the identical message to dozens of people in a row gets instantly flagged as spam by the algorithm.
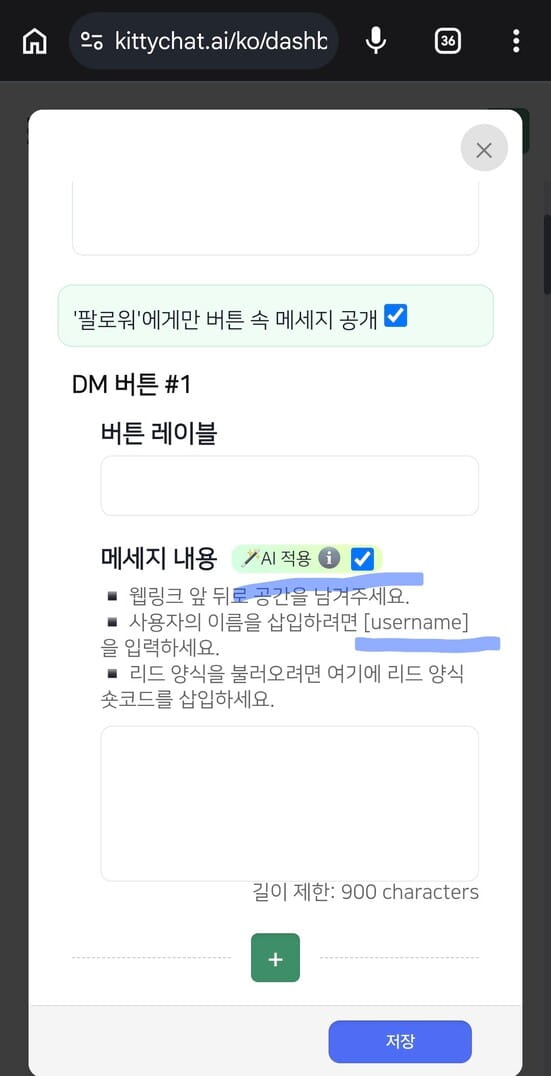
- Use variables: Insert things like the recipient’s name or an account mention (@tag). In Kittychat, inserting @[username] in the message box automatically fills in the recipient’s username at that spot.
- AI message variation: Keep the core message and link the same, but slightly vary the sentence structure, wording, and emojis for each send. In Kittychat, selecting the Apply AI button lets AI introduce variation across your messages.
④ Control the sending interval and volume (Delay)
Set a delay between messages. In Kittychat, you can adjust this under ‘Settings’ on the auto-DM page.
Recommended volume per AI chatbots (for well-established accounts): keep it around 20–30 per hour / 200–300 per day.
⑤ Turn off auto-reply to comments
If you auto-reply to comments while also sending DMs, the odds of hitting a comment restriction rise sharply. It’s safer to turn off auto comment-replies and focus only on the auto-DM sending feature.
2. What to do when auto-DMs stop or won’t send
If sending suddenly stops after running smoothly, follow these steps to find the cause and fix it.
Step 1. Check for multi-platform integration conflicts
First, check whether multiple auto-DM platforms are connected to your Instagram account at the same time. When different services try to handle the same event, a conflict can occur and halt sending.
Step 2. Identify the error message type
Knowing exactly why sending failed matters — it may be something you can fix right away.
💡 For detailed fixes by error type, see the Kittychat error-message troubleshooting guide to respond quickly according to your error code.
Step 3. Switch from a comment trigger to a ‘DM keyword trigger’
If your comment trigger has been restricted due to high volume or a specific post’s policy issue, it’s worth adjusting your strategy slightly.
- Before: Write a keyword in the post’s comments ➔ auto-DM is sent.
- Safer alternative: Guide people to “Send [keyword] via DM from the top of the profile!” ➔ the keyword typed in a DM triggers the auto-reply. In Kittychat, selecting All under post selection means an auto-reply is sent whenever the keyword is typed in a DM.
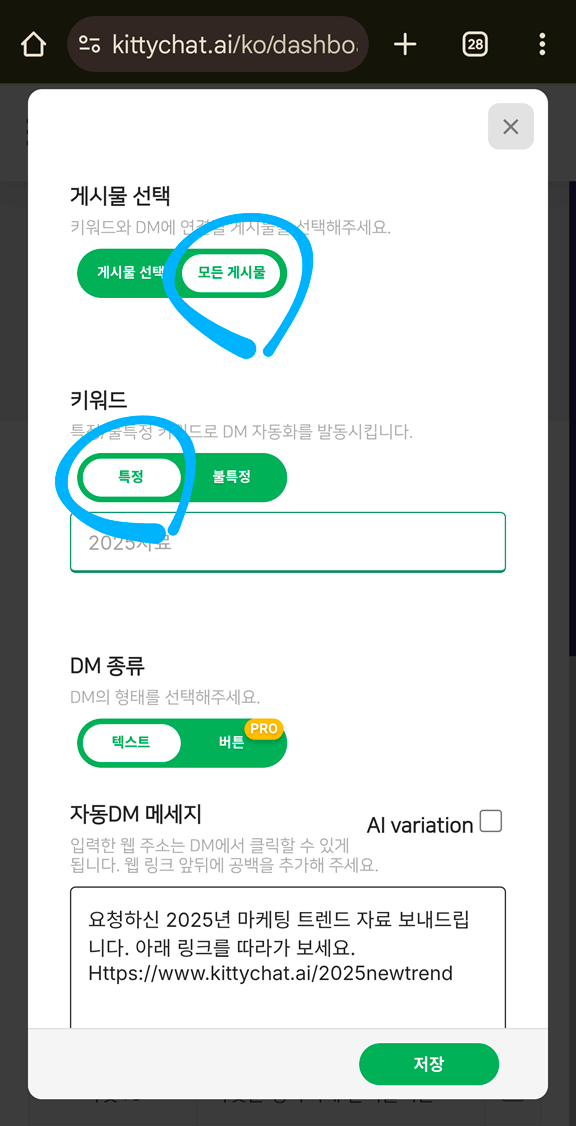
Conversations that start inside DMs bypass the platform’s restriction criteria, letting you continue your event far more safely and reliably.
Stick to safe guidelines and maximize your automation-marketing efficiency without putting your account at risk!